
Updated Jun 24, 2026
Did you know we carry a wide variety of patches that you can customize? From cross-stitch to colouring, the limit is your imagination. If you're looking for some guidance on which patch suits your craft best, look no further than this article! Why not host a badge workshop for your friends so everyone can relax, make some patches and have a great time? Alternatively, there's nothing stopping you from designing badges on your own. Whether you're making a custom jacket or adding a spark of colour to your backpack, unique patches are the perfect way to express yourself.
In this guide, we will show you the many ways you can go about designing and making your own patches. Everything from drawing with fabric markers to ordering custom embroidered badges.
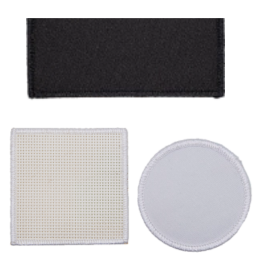
In addition to our cross-stitch patches, we have many free cross-stitch patterns. Decorate your patch with a fun design that you can tell people you made yourself! Cross-stitching requires embroidery floss and a tapestry needle. Traditionally, cross-stitch is done with two strands of embroidery floss, but always make sure to check your pattern in case of deviation. You could even freehand a pattern and make a completely unique patch! If you fall in love with cross-stitch, don't worry, there are many wonderful patterns for you to make and searching for your next project is half the fun.
Not sure what to do with your cross-stitch patch afterwards? Why not turn it into an ornament with the help of our holiday ornament blog article? It's the perfect way to add a handmade spark to your Christmas tree!
Unsure where to start? Don't worry, we have some easy steps to follow!
Looking for a patch that you can colour on? Try blank patches! We carry a variety of shapes so you can express yourself, and all have a smooth surface that you can apply your design to. A wide variety of materials can be used, from fabric markers to glitter to paint—though we recommend keeping in mind how you'll use the patch before using a material like paint. If the patch is going on your jeans, use something that's designed to permanently adhere to fabric. Make sure you set the fabric markers per the package's directions so they don't bleed in the wash! But, if the patch is going on something you don't plan on washing or getting wet, use whatever materials you please.
If you're in search of something professionally embroidered, get your group together and design a patch with the help of our design templates. We have a wide variety of templates to enable you to make all sorts of patches, from triangles to shields. You can use markers, crayons, pens and pencil crayons to create your design, and then email us for a custom patch order! Custom designs make the best patches, as they truly bring your ideas to life with a high-quality product. Plus, custom patches make great additions to secret clubs or party gift bags!
For some extra fun, challenge your unit or troop to design a patch for their next camp or special event. Have the reward be their design made into an actual badge that everyone gets for participating. There's nothing better than seeing your design come to life! We suggest letting your unit/troop vote on the winner, so everything is fair.
Please note we have a 25-piece minimum on orders for embroidered patches.
Love Designing Patches? Keep your eyes peeled for our Design A Patch contest! While you wait, why not check out the past winners?
Now that you know the many ways you can make whimsical new badges, why not invite your friends for a workshop? Your first step should be designing the badge; we suggest printing out one of our design templates to outline your idea before advancing to a badge. This way, you can discern all of the tiny details without having to worry that you made a mistake on your final design. Then, pick out your base! Some people prefer cross-stitching their design over colouring on a blank patch, while others prefer colouring over cross-stitching. Ensure you have an equal amount of both patches for your workshop. If you're designing a badge to custom order, try having several rounds of designing where everyone comes together and votes on the elements that will make it into the next round until you have a design that the whole group loves. No matter how you design your patches, we know they'll come out stunning!
Badge making can require a lot of supplies. If you're using paper, remember to have markers, pencil crayons and pencils on hand. If you're using blank patches, we advise you to use fabric markers. Some participants may even want to sew their new badges on, so be prepared with thread, scissors and sewing needles. Provide such at your own discretion; some attendees may be too young to properly handle a sewing needle. We also suggest having a few backup patches or sheets, in case someone wishes to start over or design another one.
Indy Scott is our content writer! They are nonbinary (they/he) and love to customize their clothing with patches.
Subtotal 0
